


Miniature Partyware – The Cutest New Party Trend
Why is it that you go to different parties or restaurants and get a different vibe everywhere, even if the themes and food items are the same? It is because of the atmosphere a party host creates. The table setting and décor set the mood and influence how people feel about you and your event. The way you set your party tables tells a lot about you. Putting in small efforts to set the party tables makes the guests think they are special enough to put in the extra effort. The most crucial influence elegant tableware can make is elevating the taste of the foods served. For that matter, the newest trend in table setting is the elegant mini partyware. With its elegance and cuteness, no one can say no to eating desserts in the chic plastic mini bowls.
Smarty Had A Party has developed products with just the right size and designs for an elegant mini partyware set to allure your party tables. You can find all your mini-partyware needs on our website, which will be brought to your doorstep with all the love and care. Our elegant mini partyware set is a complete package of excellence combined with prettiness.
A Perfect Kids' Party
As parents, you want the best for your kids – whether about their health or education or having fun and enjoying their time while they can, you compromise on nothing. Then why compromise on their special events? Kids love vibrance, bright colors, and small things. The disposable mini partyware is what you should be having your eyes on this party season. Your kids will immediately fall in love with the size and colors of our disposable mini partyware, and their event will be talked about among their fellows.
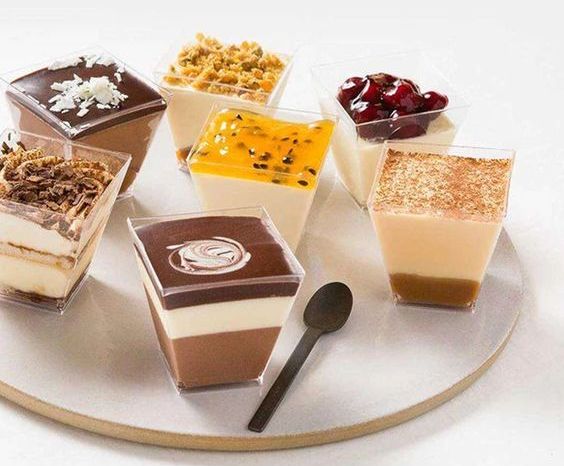
Alluring Tables with the Disposable Mini-ware
From the huge details to the smallest ones, ensure you bring the best to your guests so they can feel extravagant. With Smarty, think no more as you have the best collections of disposable mini cups, elegant mini flatware, chic plastic mini bowls, and fancy disposable mini plates, all at your doorstep. Decorating a perfect party table has been made so easy with disposable mini-ware due to its elegance and ambiance. Foods served in our fancy disposable mini plates look even more beautiful and pleasing as their color pops better. Make sure all your guests are served with their favorite drinks in our disposable mini cups to have a perfect celebration.
Recyclable Disposable Mini-ware
The best part about our disposable mini cups, elegant mini flatware, fancy disposable mini plates, and chic plastic mini bowls is that they can be recycled. This is because we care for the environment as much as your celebrations. This is precisely why our plasticware is BPA-free, which avoids the harmful environmental effects of regular plasticware. So get on the bandwagon, follow this cute new trend, and allure your tables with our elegant mini partyware set.
The Cutest Tiny Balloons
Small balloons are increasingly popular at parties, and we can safely say that they have become the new trend! These balloons are cute, versatile, and can be filled with helium or puffed up. You can do many great things with these little balloons, but however you decide to use them, they're sure to be a real crowd pleaser.
These cute cookie balloons are so easy to make: inflate the balloon, but not all the way, tie it and stick the blunt end of a skewer or toothpick into the knot.
Cute little confetti balloon sticks also look lovely at weddings or as a sweet party favor.
Mini Pinatas
For this project, you will need:
- Card stock or cardboard
- Ruler
- Masking tape
- Tissue paper
- Elmer's white school glue
- Candy or other small surprises to put inside
- String or yarn
- Scissor or Exacto knife
Directions:
Step 1: You can make any shape possible, depending on your 3-d paper product experience level.
I started off making a diamond-shaped pinata. Then, I traced and cut 4- shapes that would be taped together to create a 3- dimensional object.
Step 2: After all the shapes are cut out, tape them together. Using masking tape and avoiding scotch tape as the latter does not work well with white glue.
Match and glue the different sides of your piñata well, as this will be the primary shape, and if you have gaps, the candy can fall right out.
Before you tape the entire thing closed, tie a knot in a string length, feed it through the topmost part of the pinata, and tape it. Next, fill the pinata's belly with yummies. Tape closed.
Step 3: Using scissors and a sheet of tissue paper, fold the tissue paper in halves, again and again, cutting about a strip 1.5 inches in width. Cut small slits or a fringe along the bottom of the strip. Ensure the slits aren't too close to the top to sever the strip.
Once you're happy with your fringe, open the tissue paper back up. Then, it's ready to use!
Step 4: Take the white glue and begin gluing a line towards the bottom of the pinata. Next, we will add the fringe, starting with the bottom and working our way up. Finally, add your fringed tissue paper in rows, spacing about a 1/4 inch apart.
Step 5: The sky's the limit with all the different shapes you can make, but I'll go through two shapes to give you an idea of different techniques.
For this pinata, you can make a cylindrical shape simply by cutting into exact-sized circles and taping it to a cardstock length. Instant cylinder! You can even cheat and just use a toilet paper roll!
I made a small hole in the center of one circle, fed a length of string through it, and then added a bunch of yummies. Taped it all up and glued it on the fringe. I cut the shape in tissue paper for the circle ends and glued it right on top. You can fringe this as well if you want.
Step 6: I wanted to make a number shape, which did not prove to be difficult at all. So, start by cutting two identical shapes of card stock. Next, put small pieces of tape around the perimeter of one of the shapes to quickly add the stripes of card stock that would create a 3-dimensional look. Once you have taped up one side entirely, add a small hole to the top portion so the string can be inserted and taped. Next, add in all the goodies. Now you are ready to tape up the second shape (which would have to be flipped so that its mirror image would match the first shape). Then I added the fringe, trimming it periodically so that the original shape was more obvious.
Step 7: No pinata is safe without a trusty whacking stick, but we'll need a mini one to break our mini pinatas!
I removed the stick, ended off a sponge brush, and wrote on it with a sharpie, but you could also use a pencil- anything sturdy enough to break through the pinata.
Party on, Smarties! With love Smarty had a Party!


